Wednesday, 28 March 2012

Beth Chatto and Clacton seafront

I'd not been to Beth Chatto's garden before so I thought now was as good a time as any to help with the planting ideas for the masterplan design. The garden is beautifully laid out around a series of lakes with some linking bridges and then moves on into a woodland area, which was looking good. The dry garden is at the front and used to be the car park.

I'm looking for the spring ideas and there are a few that I think would work, especially as afterwards we went to Clacton - never been there before so quite interesting - and saw some of the plants and shrubs there.


Above 3 The lakes and stream at Beth Chatto's garden
This gorse looked really good in front of the white blossom and very bright in the sunlight. It has been kept quite small and so I think there is a place for it in the planting scheme I'm doing. It will give winter colour and structure too.
Salvias and Rosemary were doing well in the dry garden and also in the planting along the promenade at Clacton, these could work well to give winter structure.


Alchemilla mollis in the planting at Clacton
Alchemilla mollis is one of my favourites, especially just after the rain when it collects little globules of water that then shimmer in the sun. They are quite tough and drought tolerant but I was unsure about the salt, but if they're surviving happily at Clacton then I'll give them a go in Eastbourne. The beds are going to be sunken so will have some wind protection. Clacton has an easterly aspect and Eastbourne is southerly but that won't affect this plant.


These grasses gave good structure on the seafront,
but easy to see they're not blasted by a prevailing westerley wind
Along the promenade there is a series of sunken gardens each with a different theme, 1920's, Commemorative Pleasure garden, Sensory garden, Rose garden.

So a good day out, and finally, the cherry blossom in my front garden has been flowering slowly over the last few days and this morning just looked fantastic...


Tuesday, 27 March 2012

Masterplanning 9 - 1:50

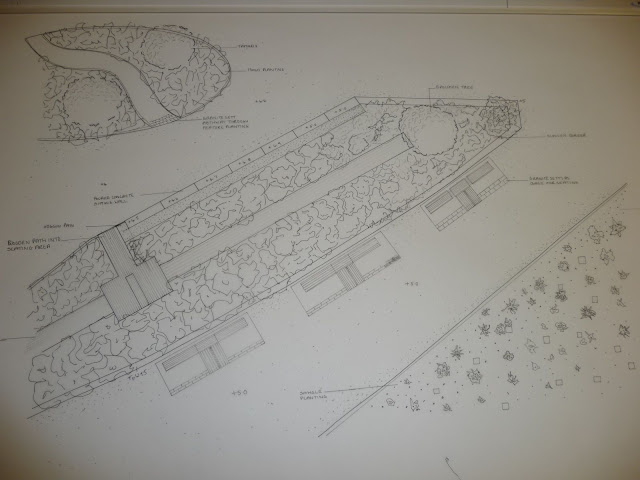
We've moved on from the 1:200 to the selected area for the 1:50. The planting needs to be a minimum of 40% and I think without adjustments the area is borderline to achieve this. So I've been looking at how the area can be refined, be more interesting and full of gorgeous planting. I had already decided that instead of a sloping border I would make it a sunken border, this would create a more intimate space. In class yesterday I was exploring how best to design the space and today drew out a couple of ideas.

In the first design below I've widened the beach area and added more shingle planting that will be quite dense next to the promenade and gradually thin out towards the sea. The central border is the sunken border with a linear walkway and a seat with a view down through the planting. There is a sitting wall on the north west of the border that is stepped in line with the level change of the sculpture park area. There is seating on the promenade level, needs refining and the bottom left isn't positioned properly but that will be sorted.

The border on the top left has a path through it in black granite setts to match the edges of the paving.


In the second design I've kept the beach edge as in the 1:200 and widened the sunken border. I had very wide paths so reducing them is quite feasible. In the wider sunken area I've put an indirect walkway with stepping blocks at the north east end onto a seating area. I think this design gives scope to reveal hidden views, add in some more trees, use different heights of planting to good effect.


I need to make a decision as to which area works best, within each idea there is opportunity to change from continuos walkways to stepping stones, or redirect the path, it's more the principle of widening the border area or the beach area. If anyone out there has a view I'd be really happy to hear it, in the meantime I'll get on with the planting.

Tuesday, 20 March 2012

Masterplanning 8 - Interim Crit

The build up to the interim crit on Monday was completely full on. I didn't stop from last Tuesday until Sunday, don't get me wrong, I didn't do all-nighters, but I did do a lot of hours, and for me it was worth it. I'm  pleased with how my work has progressed from January and I recognise that there is still a way to go, I just need to sort out the presentation of the work. I like the design I've done but I'm not getting it across to others.

Design Plan 1:200
The style I'm developing is a mix of hand drawn and photoshop, so the surfaces and textures are watercolour that I've made into bucketfills and the trees are hand drawn and painted using watercolour.

The model went down well, it is simple and unfinished, so I've been studying both the plan and the model together and maybe it is the simplicity of the model that makes it work.

Model 1:200
So I'm going to experiment more with the surface textures, drop the yellow on the plan and introduce some different trees to give the woodland glade a more realistic look. I'm thinking less is more.

The sequential sketches would have benefitted from being in a sequential order (Yes I know the clue is in the title...) It would have made more sense of the direction of the shadows which are too dark, Parky did tell me that but I said no, they really like dark shadows, but as I found out yesterday not on the sketches. Sheet 2 wasn't finished, but I did print out the outline and know what the final 2 are going to be. I need more people and different ones in each. Textures need looking at which is a constant theme across all the work, as is annotation, page layout etc.

Sheet 1 of the sequential sketches
Sheet 2 of the sequential sketches
Woodland walk through the model, shows the rise and fall of the north promenade

Through the Quercus ilex in the sculpture park
A stroll up the north promenade with cloud pruned Escallonia macrantha on the right
The meeting area with the Tamarix tetrandra in the foreground and the Quercus ilex, Pinus contorta and  Salix alba at the back. 
The sections need more refinement, a pretty long list actually which I'll work through.
Sections AA and BB

Sections CC, DD, EE
I'm going to render the second page and add a third with 1:50 sections showing the level changes in more detail.

So that's it for 1:200 now. We move on to 1:50, the area was chosen yesterday and it will be a lot more about the planting - so to prepare I took myself off to Gravetye this afternoon where I worked before I started at Greenwich, I had intended to carry on but couldn't realistically fit it in. The team there are great and were keen to hear all about the course and the design and what plants was I going to use and had I thought about xyz plant - it was brilliant and just what I needed to clear a very tired head. The gardens were looking good, full of spring promise.


Spring colour at Gravetye Manor

Wednesday, 14 March 2012

A photoshop mystery...

When I was doing a section in photoshop the other day I somehow managed to get a swatch that I'd made of the sky on the paintbrush to do the background, it was an accident but I liked it and so wanted to repeat it - the problem is I don't have a clue as to how the swatch ended up on the paintbrush and I'm in the time wasting zone so have had to park it. (I now have a time-wasting zone, based on Jamie's SUMO principle)

So, this is a plea for help, if anyone out there knows how to do this and can let me know I would be very grateful as it would be good if my skies looked similar in appearance.

Section AA, I'd like to repeat the sky. The trees are a little big - or as Julia F said 'in your dreams! -
I can work on them
Interim crit next Monday so am working through the list of what to pin up.

Saturday, 10 March 2012

Knole Exhibition

The first day of the Exhibition was quiet, but the House doesn't open until today so I'm sure it will be much busier. It all looked really good.


L-R Dom, Lissy, Marian, Harriet, Ben, Me, Tom, Julia, Ling
Thanks to Julia who put loads of extra time and effort into making sure the exhibition was delivered on time and looked good (and for the photos).

Sections

I've been working on sections, hand drawn off plan in 1:200. I'm going to import them to Vectorworks, scale up to 1:100 and annotate.


Sections so far, the bottom one should read EE
More to do, I'm trying to do enough to get the different angle views across the site.

Sunday, 4 March 2012

Masterplanning 7 - Overlays

We have a pin-up tomorrow of all our overlays which includes levels, hard materials, soft landscaping, drainage and lighting. I just need to finish lighting but thought I'd post what is completed so far.


Levels Overlay

Hard Materials Overlay

Soft Materials Overlay

Drainage Overlay
 There'll be a design freeze on the 1:200 tomorrow so I'm pleased to get this detail done as a few small changes were required.

Logo and Branding (Adv Rep)

Put some ideas together for company logo, I chose the Hellebore as I have been growing them from seed, they take years! No wonder they're so expensive in the garden centres. For me, along with snowdrops they mark new beginnings and are full of delight - just like your garden will be after I've designed it!


Thursday, 1 March 2012

Hard Landscaping

Finalising the hardmaterials for the masterplan. I'm using resin bound gravel for the surface and want to inset waves of colour, I've not worked with this before so I went along to AddaGrip in Uckfield - quite local to me  - and they couldn't have been more helpful. I took the design along and we talked through it, how certain edges could be retained etc. it was really interesting, for a moment it felt like the plan was live! They gave me sample boards and brochures. In their offices they have a lot of the product on display so you can see and feel the differences between each one. A very useful trip.

Samples of the regular colours available for resin bound gravel

Samples of the colours available to make patterns etc, in the main surface